
The Art and Science of Photographing Water Drops on Glass
This project was inspired by Joey Terrill, a professional photographer and Nikon Ambassador. After seeing Joey’s images of water droplets, it took me several years and the COVID19 pandemic to get me to focus on the project.
To understand what I mean by “water droplet magic”, I open with this video presenting a series of the images I created. (Expand to full screen for best viewing.)
Music by Joystock - https://www.joystock.org
How Are These Images Created?
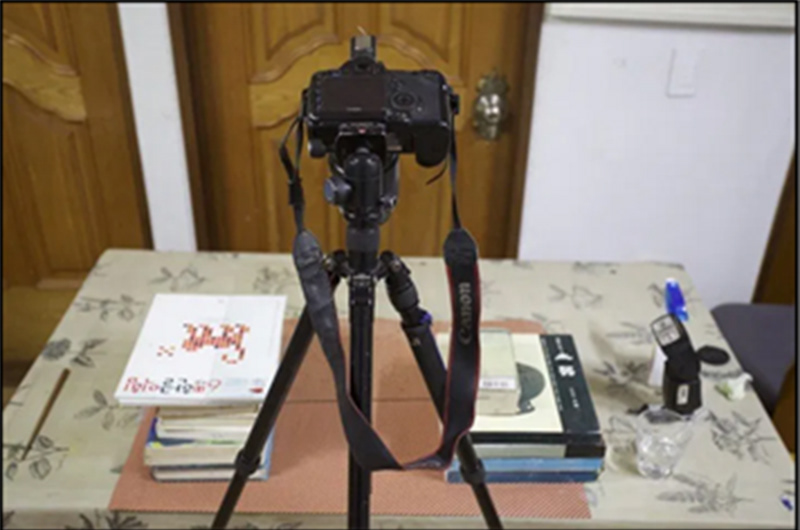
It is easy and inexpensive to get a taste for shooting water droplet images. You will need a camera and tripod, a sheet of clear glass placed across two stacks of books, some water, and a syringe to position water droplets on the glass. Then place an interesting subject and background material beneath the glass and start shooting. After a short time experimenting, you will begin to produce interesting images. However, it you want to shoot more advanced and refined images, more planning, tools, and creativity are required
It is easy and inexpensive to get a taste for shooting water droplet images. You will need a camera and tripod, a sheet of clear glass placed across two stacks of books, some water, and a syringe to position water droplets on the glass. Then place an interesting subject and background material beneath the glass and start shooting. After a short time experimenting, you will begin to produce interesting images. However, it you want to shoot more advanced and refined images, more planning, tools, and creativity are required
© Digital Photography School
Taking Water Droplet Photography to the Next Level - What Is Required?
At the highest level, the list of items required include:
- Camera and Tripod
- Lighting Equipment
- Shooting Supplies
- Shooting Platform
- Creativity
Here is more detail on each:
- Camera and Tripod
- Lighting Equipment
- Shooting Supplies
- Shooting Platform
- Creativity
Here is more detail on each:
Camera and Tripod
A DSLR or mirrorless camera and a high quality macro lens are required. I used a Nikon D850 with the Nikon 105mm macro lens for most of my shots. A sturdy tripod is needed. It’s critical to run hands-free so a wireless shutter release is essential. I also chose to shoot tethered to my computer so I could see results immediately.
A DSLR or mirrorless camera and a high quality macro lens are required. I used a Nikon D850 with the Nikon 105mm macro lens for most of my shots. A sturdy tripod is needed. It’s critical to run hands-free so a wireless shutter release is essential. I also chose to shoot tethered to my computer so I could see results immediately.
Lighting Equipment
I used a variety of lights and modifiers. For lights, speedlights, LED lights and panels, and flashlights all came in handy. Light modifiers including snoots, grates, diffusers, and color gels were also put into play.
I used a variety of lights and modifiers. For lights, speedlights, LED lights and panels, and flashlights all came in handy. Light modifiers including snoots, grates, diffusers, and color gels were also put into play.
Shooting Supplies
Here is a list of other essential items I used:
- Glass Cleaner
- “Rain-X” or equivalent
- Distilled Water
- Food Coloring
- Mist Spray Bottle
- Syringes or Hypodermic Needles
- Bubble Level
- Interesting Objects (as subjects)
- Background Materials
Here is a list of other essential items I used:
- Glass Cleaner
- “Rain-X” or equivalent
- Distilled Water
- Food Coloring
- Mist Spray Bottle
- Syringes or Hypodermic Needles
- Bubble Level
- Interesting Objects (as subjects)
- Background Materials
Shooting Platform
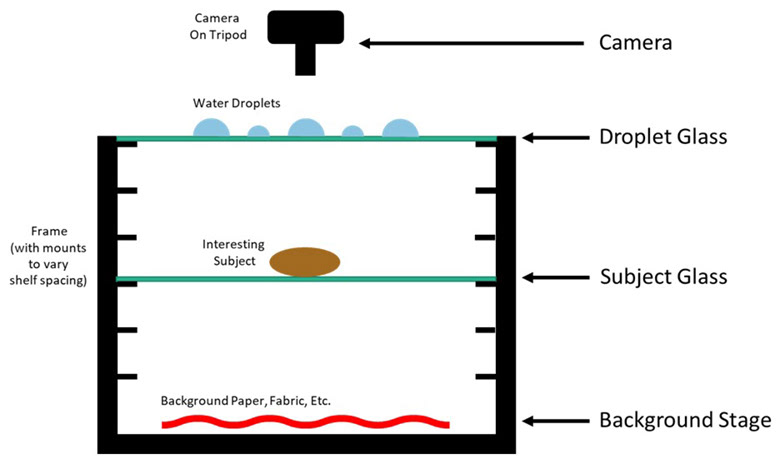
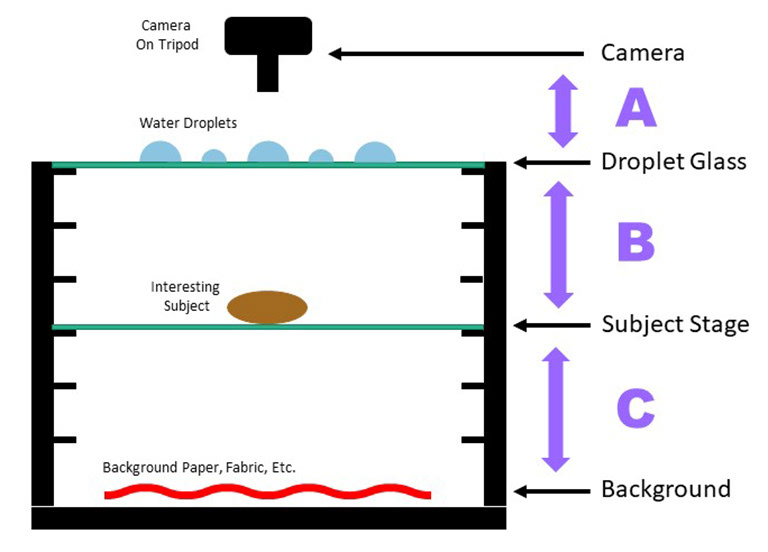
The single most important item for producing higher quality water droplet images is a stable and flexible shooting platform. My challenge was that I didn’t want to spend a lot of money building the shooting platform only to find out that I wasn’t that excited about the images. (Little did I know!) The following diagram illustrates what I put together using scrap 2x4 lumber, nails and a couple sheets of glass. In three dimensions, it looks like a small end table turned upside down (sitting on its top with legs straight up).
The single most important item for producing higher quality water droplet images is a stable and flexible shooting platform. My challenge was that I didn’t want to spend a lot of money building the shooting platform only to find out that I wasn’t that excited about the images. (Little did I know!) The following diagram illustrates what I put together using scrap 2x4 lumber, nails and a couple sheets of glass. In three dimensions, it looks like a small end table turned upside down (sitting on its top with legs straight up).
Shooting Platform
My platform was designed around the size of the glass. While low-lead glass would be preferred, I used two 16x20 picture frame replacement glass panels. That determined the base dimensions for the platform. I used 24” 2x4s for the uprights. I drilled holes every 3 inches in these uprights and used finishing nails as the pegs that support the glass. It was inexpensive yet addressed the goals of stability and flexibility.
When producing these images, it is important to keep the various planes parallel so as not to distort the macro image. The planes include the camera (sensor/lens), the droplet glass, the subject glass and background. I used an inexpensive bubble level to ensure everything was level and parallel.
The above diagram shows the configuration and relative position of camera, water droplet glass, subject glass, and the background. The spacing will be discussed later.
Creativity
Unlike many types of photography where the world is just waiting to be captured by the camera, these images are envisioned in the mind of the photographer and brought to life through choices. Each image is a new experiment. Creativity makes it all happen.
Unlike many types of photography where the world is just waiting to be captured by the camera, these images are envisioned in the mind of the photographer and brought to life through choices. Each image is a new experiment. Creativity makes it all happen.
Putting It All Together
With all the pieces ready, I prepared my shooting ‘space’. First, I chose a room that I could darken to minimize ambient light. Water droplets act like a lens and will reflect and refract light from undesired light sources. My office is the best I could do but I still needed to do all my shooting after dark.
I placed my shooting platform on the floor with sufficient room to work around it. One side is consumed by the tripod, but the other sides can be used for access to set up and light the subject and background. At this point I maneuvered the camera to its shooting position and made sure that all planes were parallel and level. I connected my camera to my computer using a long USB cable and opened Adobe Lightroom in tethered mode so I could control the camera from the computer.
The glass is prepared by cleaning it then applying RainX using a soft cloth, then buffed when dry. This produces nice round water droplets and allows you to move the water drops around with the tip of a syringe.
Composing a Water Droplet Image
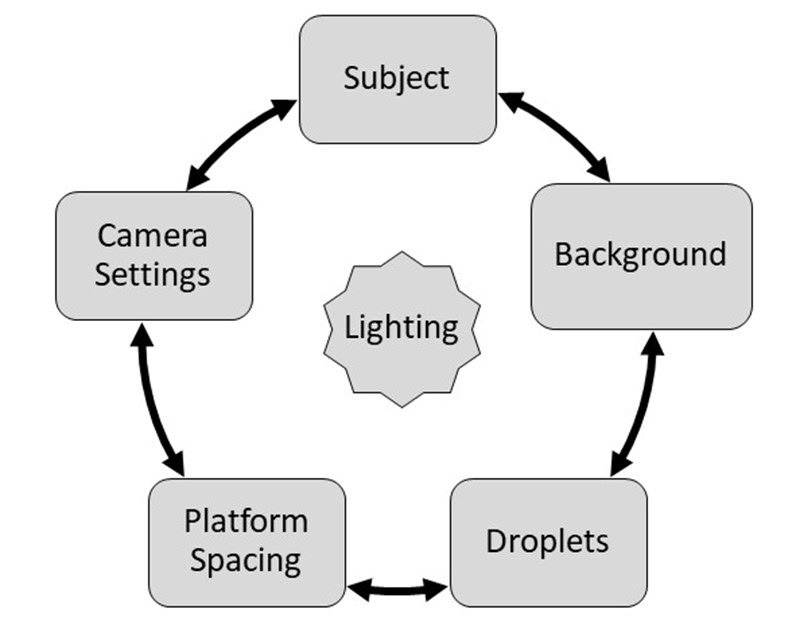
There are six interrelated elements to composing a water droplet image. Taken as variables, these 6 elements lead to an infinite set of possibilities. It’s up to the photographer to choose and adjust each element to produce an attractive image.
Subject
The subject or object and background are what will get refracted through the water droplets and into the camera. While this is macro photography in that I’m focusing on the small image refracted through the water droplets, the subjects and backgrounds do not have to be small. I experimented with different sizes and types of objects before understanding what worked best for me. Well-defined objects with sharp edges or strong patterns made for the best subjects. Most good subjects were flat or relatively flat. Besides grabbing items from around the house, I also shopped at Hobby Lobby, Michaels, Home Depot and Dollar Tree to find my subjects.
Backgrounds
The background may or may not play a significant role in the composition of a waterdrop image. Sometimes, the background is the subject of an image. I often used monotone sheets of poster board (white, black, or colored) but I also used some brightly colored fabrics. I was always concerned with how the background supported the subject of my images. At a minimum, the background material needs to be large enough to cover the camera’s field-of-view. Since water droplets collect light outside the camera’s field-of-view, I often draped the background material along the sides of the platform to block unwanted light and reflections.
Droplets
Water drops can be placed on the top glass to support the desired composition. I describe the types of patterns I applied as Random, Semi-Structured, and Structured.
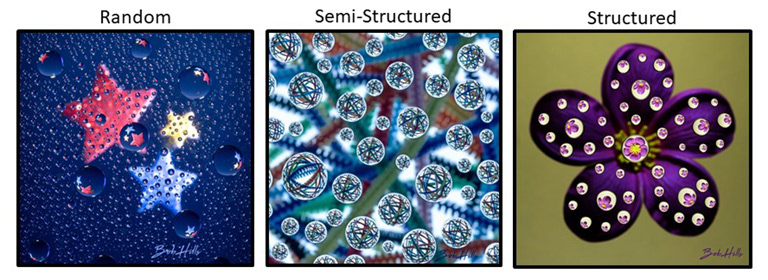
For the most random patterns, I used a spray bottle where I could adjust the nozzle from coarse to a fine mist. I used a more structured approach on most of my images where I employed a syringe to place the droplets. The semi-structured patterns start by randomly placing large droplets and then adding medium and small droplets afterward to cover the camera’s field-of-view. For more intricate designs, I used a structured pattern where the droplets were placed and sized with reference to the subject. This can be tricky because I was placing droplets on the glass while looking at the monitor on the back of my camera. On a few of my images, I added color to the droplets by using food coloring in the water.
Platform Spacing
There are three spacing intervals on the shooting platform that impact the final images. They are market as A, B and C on the following diagram.
There are three spacing intervals on the shooting platform that impact the final images. They are market as A, B and C on the following diagram.
A – Lens-to-Droplet Glass Spacing. This distance determines the size of the water droplets within the image frame. The closer you position the lens, the larger the water droplets will appear in the image. This spacing also affects the depth of field to the background (around the water droplets). In my case, I found it too difficult to manipulate the height of my camera cantilevered out over the glass on a tripod. Even slight adjustments can be difficult to make. Instead, I chose to leave this spacing fixed to just beyond the near-focus of my lens. I decided to use a higher resolution camera so that I could easily crop an image if I wanted larger droplets in the image.
B – Droplet Glass-to-Subject Glass Spacing. This distance determines the subject size within each water droplet. In the following images, I used the same subject, a 5-inch laser-cut disk, and adjusted the subject glass 3”, 6” and 9” below the Droplet Glass.
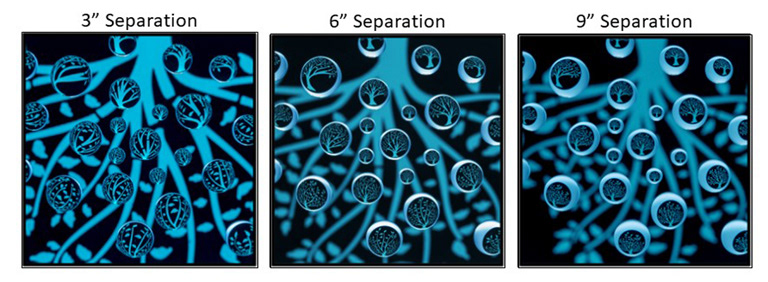
The background is a solid blue color lit with a speedlight. What you see is that the disk fills the water droplets with a 3” separation and when moved to 9”, the background becomes more visible in the water drop (the light rings around the edge of the droplets).
C – Subject Glass-to-Background Spacing. In an ideal shooting platform, you would vary this spacing to further blur the background. However, given the fixed height of the platform and the more critical nature of the Droplet Glass-to-Subject Stage Spacing ( B ), this space is relegated to creating depth (to a limited extend) and providing for more creative lighting possibilities. In general, the more spacing available in B and C, the more flexibility you have with lighting.
Lighting
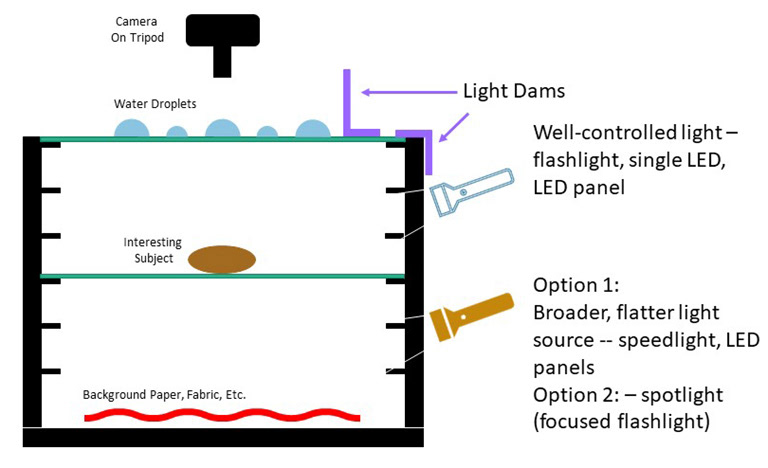
As in all photography, lighting is essential. Lighting will reveal, color, texture, and tone of the subject and will set the mood with color, texture, and tone of the background. For the most part I used flashlights, single LED lights (i.e. Lumicube), and small LED panels to light-paint the subject. Snoots, grates and barndoors were used to focus the light. For the background, I used a Speedlight or large LED panel to create flat lighting and focused flashlights for spotlighting. I frequently used different color lights (colored LEDs or gels) to add interest to my subjects and/or background. I also used foam core, black paper, and dark fabric to make light dams to control unwanted light hitting the water droplets.
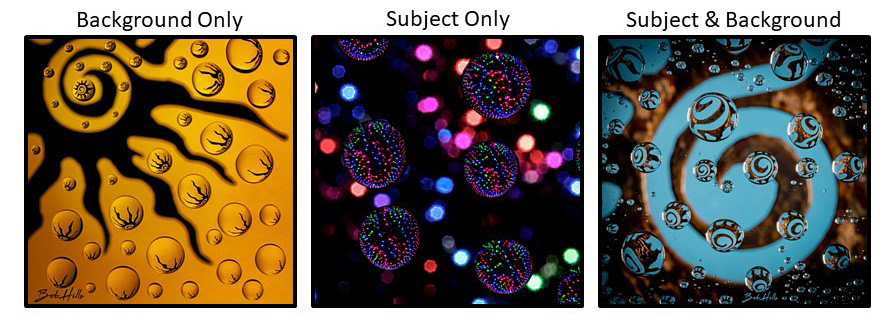
The subject and background lighting can be used to create very different effects in the images. Here are some examples:
Camera Settings
I started by turning off everything automatic. No Auto/Program, Aperture Priority, or Shutter Priority Modes and no Autofocus. Shooting in Manual mode was necessary so that I could adjust the aperture and shutter speed independently.
The most critical exposure setting is the aperture. The aperture will determine the depth-of-field in the droplets. For each setup, I would focus on the largest water droplet near the center of the composition, then set my aperture to get a clean line between the droplet and the glass. If the subject (below the droplets) appears too sharp around the water droplets, I added spacing (as described above) by moving the subject glass further away from the water droplet glass.

Closely compare the flowers (subject) and the edges of the droplets in the largest water drop and one of the small ones.
The shutter speed setting is less critical because I worked in a darkened room where I had control over the light sources. Speedlights only take a fraction of a second to do their job, but LED panels and flashlights (when light painting) could take another 10 to 20 seconds. I always errored on leaving the shutter open longer and sometimes used the camera’s 30 second maximum (without going to Bulb).
The ISO will affect the shutter speed more than anything else. I chose ISO 400 because it reduced the exposure time without adding noise to my images.
Post-Processing Water Droplet Images
Once your image is captured you can decide how much or how little you want to edit it. In my case, I spent most of my editing time cleaning up dust and spots in the image. I found Tony Kuyper's TK Combo or CX Panel’s Dust Removal Tool to be very handy here. I typically cropped my images to conform to a standard print ratio and I would do some minor tone and color adjustments to help accentuate the droplets. You could add special effects with Photoshop, but I avoided it.
Challenges
Here is my list of challenges when photographing water droplets on glass:
Stray light – since water droplets are small lenses, they gather light from all around. While I was not able to eliminate these hindrances, I made every attempt to minimize them.
Keeping the Glass Clean – the two culprits are dust and residue build-up. It can take more than an hour to prep and shoot a good image. In the meantime, dust is starting to fall into your macro image. Unless you have the luxury of shooting in a ‘cleanroom’, this will always be an issue. I also found that the glass panels built up more visible residue (from cleaning) over time. I replace glass panels in the course of this project in lieu of dealing with the residue.
Evaporation – this might not be an issue depending on where you live. I live in the desert so the long setup and shooting times permit evaporation of water droplets – they lose their shape and leave a dirty spot behind. They are easily edited but are more problematic in highly structured droplet patterns.
Accidental bumps and drops – this happens when working in the dark and given the macro photographic nature of shooting the droplets, even little bumps can cause a big problem.
Paying attention to all the details simultaneously – yes, we do this with all our photography, but the circumstances and environment are different here. It’s dark, the composition is on a macro scale, focus and depth-of-field can be hard to see, and lighting from shot-to-shot (especially while light painting) is hard to control. This explains why I chose to shoot tethered to my computer. Immediately, after each shot, I could get a large screen view of the image, make an adjustment, and shoot again. This is impossible if you are transferring images in batch from your memory card to your computer.
How Was This Image Made?
Now that I have provided you insight into how I created my images, watch this next video, and try to determine how I made each image.
Music by Joystock - https://www.joystock.org
Rewards of Water Droplet Photography
My Water Droplet Magic project was an experiment. I was attracted to similar images and wanted to give it a try. What I appreciate most is that I was responsible for creating the image from its conception through its execution. I chose the composition, subjects, backgrounds, and lighting approach on every image. During the experiment, I encountered countless problems for which I needed to find a solution or a work-around. Beyond the creative aspects, I learned more about macro photography and lighting. While the lighting was on a small scale, all the principles apply to larger subjects. Finally, there are the images. I quickly learned to make beautiful images which inspired me to making more, and more complex images as I progressed through the experiment. A sampling of my images is on my website at Bob Hills - Water Droplet Magic (bobhillsphoto.com).
Beyond the Experiment
As I progressed through the Water Droplet Magic experiment, I decided it would be interesting to share my experience with others – not only the resulting images, but the set up and process. This paper highlights that process, but I also have created a Zoom-based presentation that I have shared with photography clubs in my area. If you belong to a club that might enjoy my Water Droplet Magic presentation, contact me via my website - Contact. This presentation is Zoom-based so I can deliver it to English-speaking audiences anywhere.